
Should You Get a Home Inspection on a New Construction House?
A new construction home is a great purchase. Not only do you get the benefit of first ownership (brand-new equipment, a warranty, etc.), but the value of a new home is great – much better than an equivalent piece of land with a 1970’s house full of bad wiring.
However, you should get a full home inspection done on every home, regardless of age. Here’s why:
There’s at least one issue you won’t find yourself
In every new home construction I’ve inspected, I have never found a home without at least one issue the owner wouldn’t have found until it was out of warranty.
(Note: all pictures on this page are from actual new-home inspections I have performed)
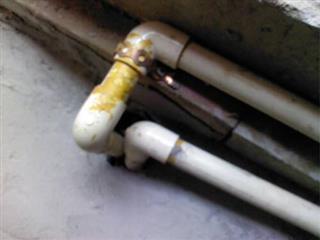
Leaking Temp-Pressure Relief Valve
This brand-new hot-water tank had a leaking TPR (Temperature-Pressure Relief Valve). A TPR valve is designed to pop open and release water/steam from an overheating tank. They’re actually very delicate and a failing valve can suddenly pop open by itself, emptying the water out of the system and possibly injuring someone at the same time. This valve will need to be replaced.
Your Warranty Won’t Cover Everything
In Vancouver, most warranties use the Homeowner Protection Office’s performance guidelines on what is covered by a warranty. However, with a typical 2 / 5 / 10 warranty you may be out of luck by the time something fails. With a two-year mechanical warranty, imagine discovering this:
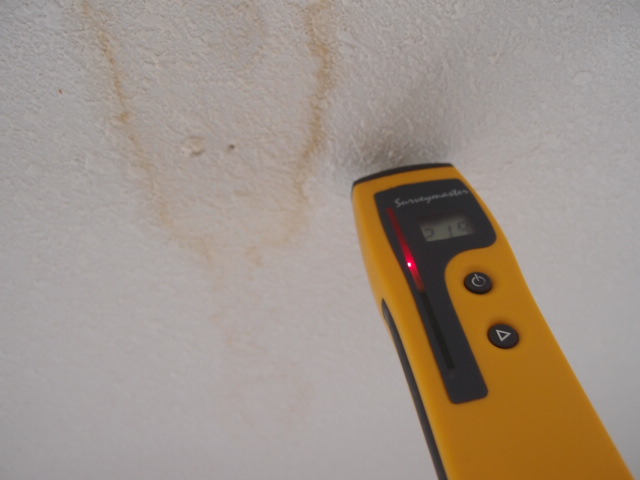
Radiant Floor Leak in Ceiling
This owner’s radiant floor heating system had been leaking for years, and eventually formed a stain on the ceiling of his downstairs office. When he tried to claim it under warranty, he discovered that he was one month past the expiration of the mechanical coverage. An inspector with a good quality thermal imaging camera may have discovered this earlier, either during the initial inspection or the 11-month warranty inspection.
Catching a latent issue early on can be the difference between paying out-of-pocket, and instead having the builder/warranty company efficiently fix the problem.
The Builder Will Forget Something
Building a home is a huge undertaking. Which is why this kitchen backsplash ended up being completely missed by the tradesperson:
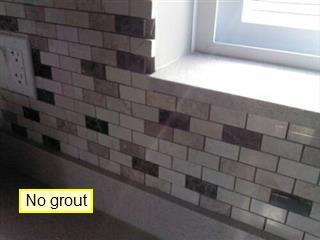
This kitchen backsplash was missing grout.
The entire kitchen was missing grout! This is an easy catch, but having a good quality home inspection report to give to the builder will make things easier for both of you.
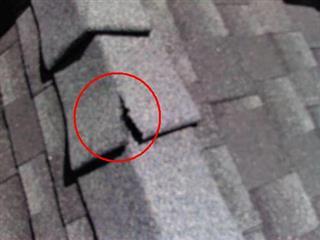
Torn Roof Shingles
Finally, here’s a photo from a brand-new roof I inspected last summer – I found five ripped, missing, or loose shingles on this roof. After the inspection, the client got them all repaired at no cost. Code inspectors will often avoid walking the entire roof and these frequently go missed. I’m glad we found them before the rainy season!
Contact us today to book an expert home inspection for your new home. You’ll be glad you did.
Dangerous Foundation Problems in Deep Cove, North Vancouver – Featured Home Inspection
Today’s featured inspection is a custom house in Deep Cove, North Vancouver.
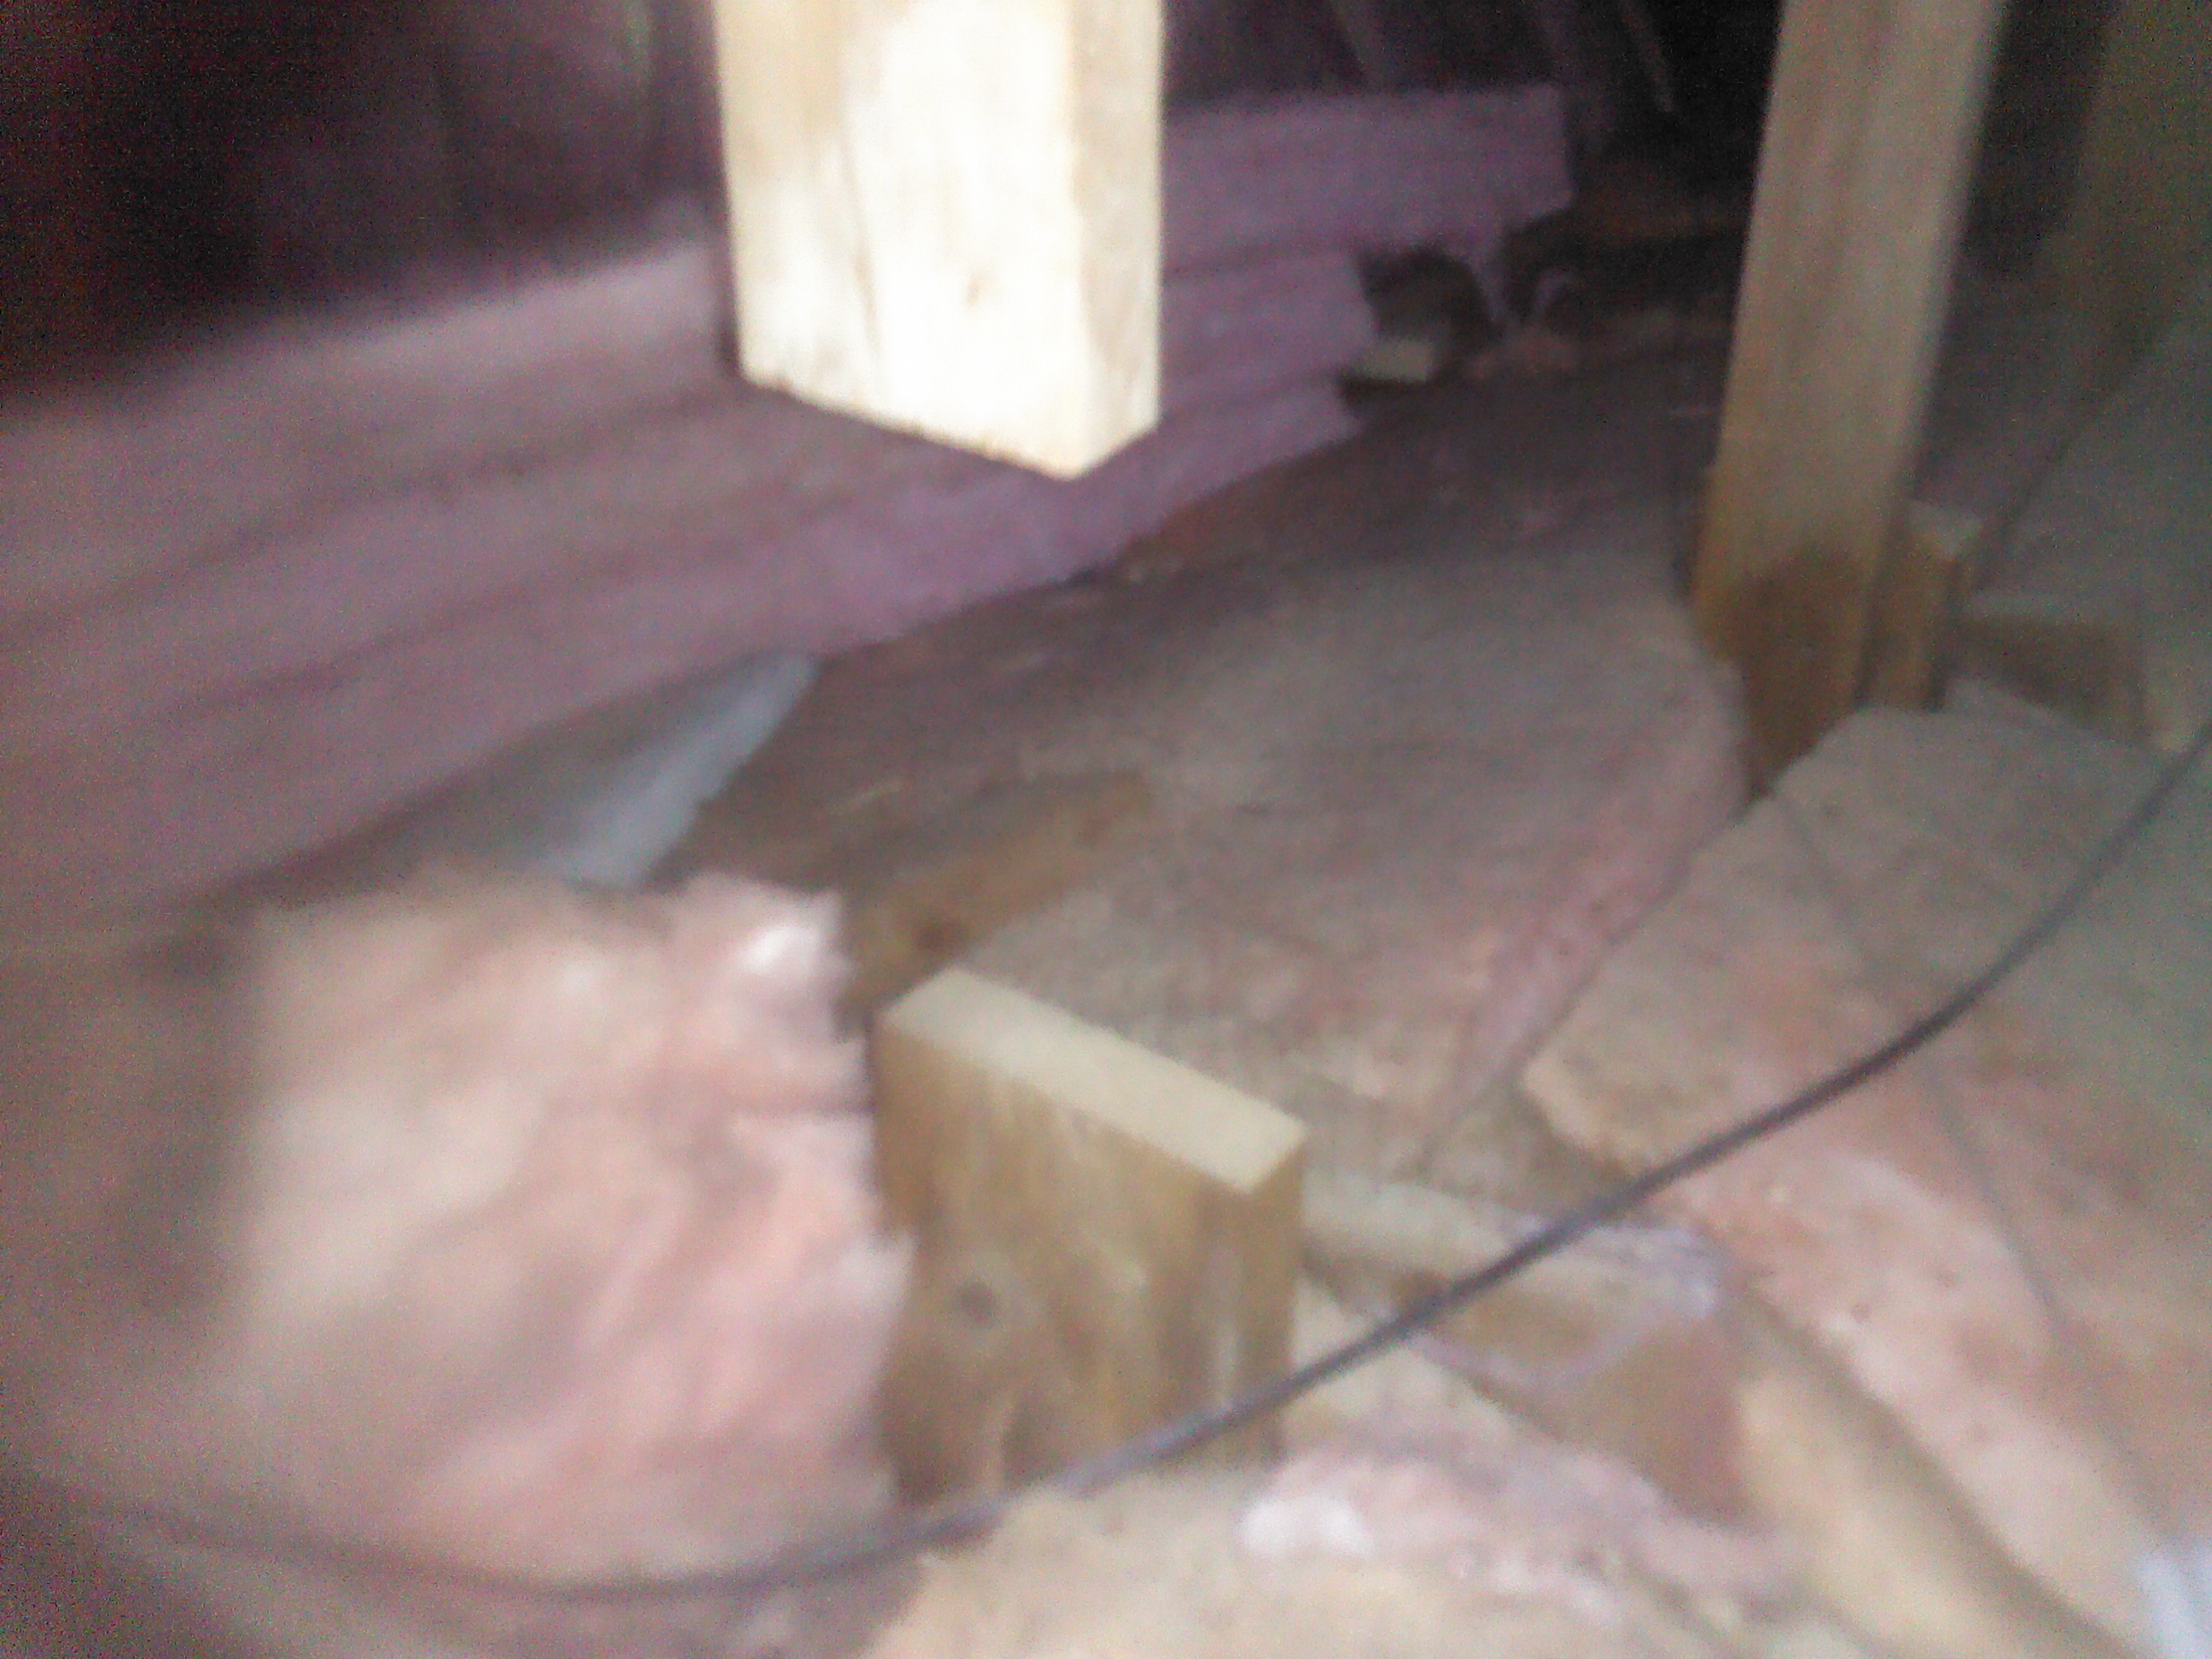
The structure design on this property was extremely unique – if you were inspecting this house and saw the following in the basement, what would you think?

Crawlspace floor
In case it’s hard to see, that’s water running under the house. The entire house was built into bedrock on the side of a mountain. A poured concrete foundation sat atop the bedrock, forming a crawlspace. No wood framing members made contact with the bedrock (a wise choice). Prior to the inspection, we obtained a geotechnical report from the District of North Vancouver.
The attic structure had been modified; here we see some framing members had been cut to facilitate the installation of one of the two new skylights. My good friend Ken Hunter was called in to repair the defect:
Cut framing members in the attic
Next we inspected the storage shed, which looked fine…until I inspected its foundation…
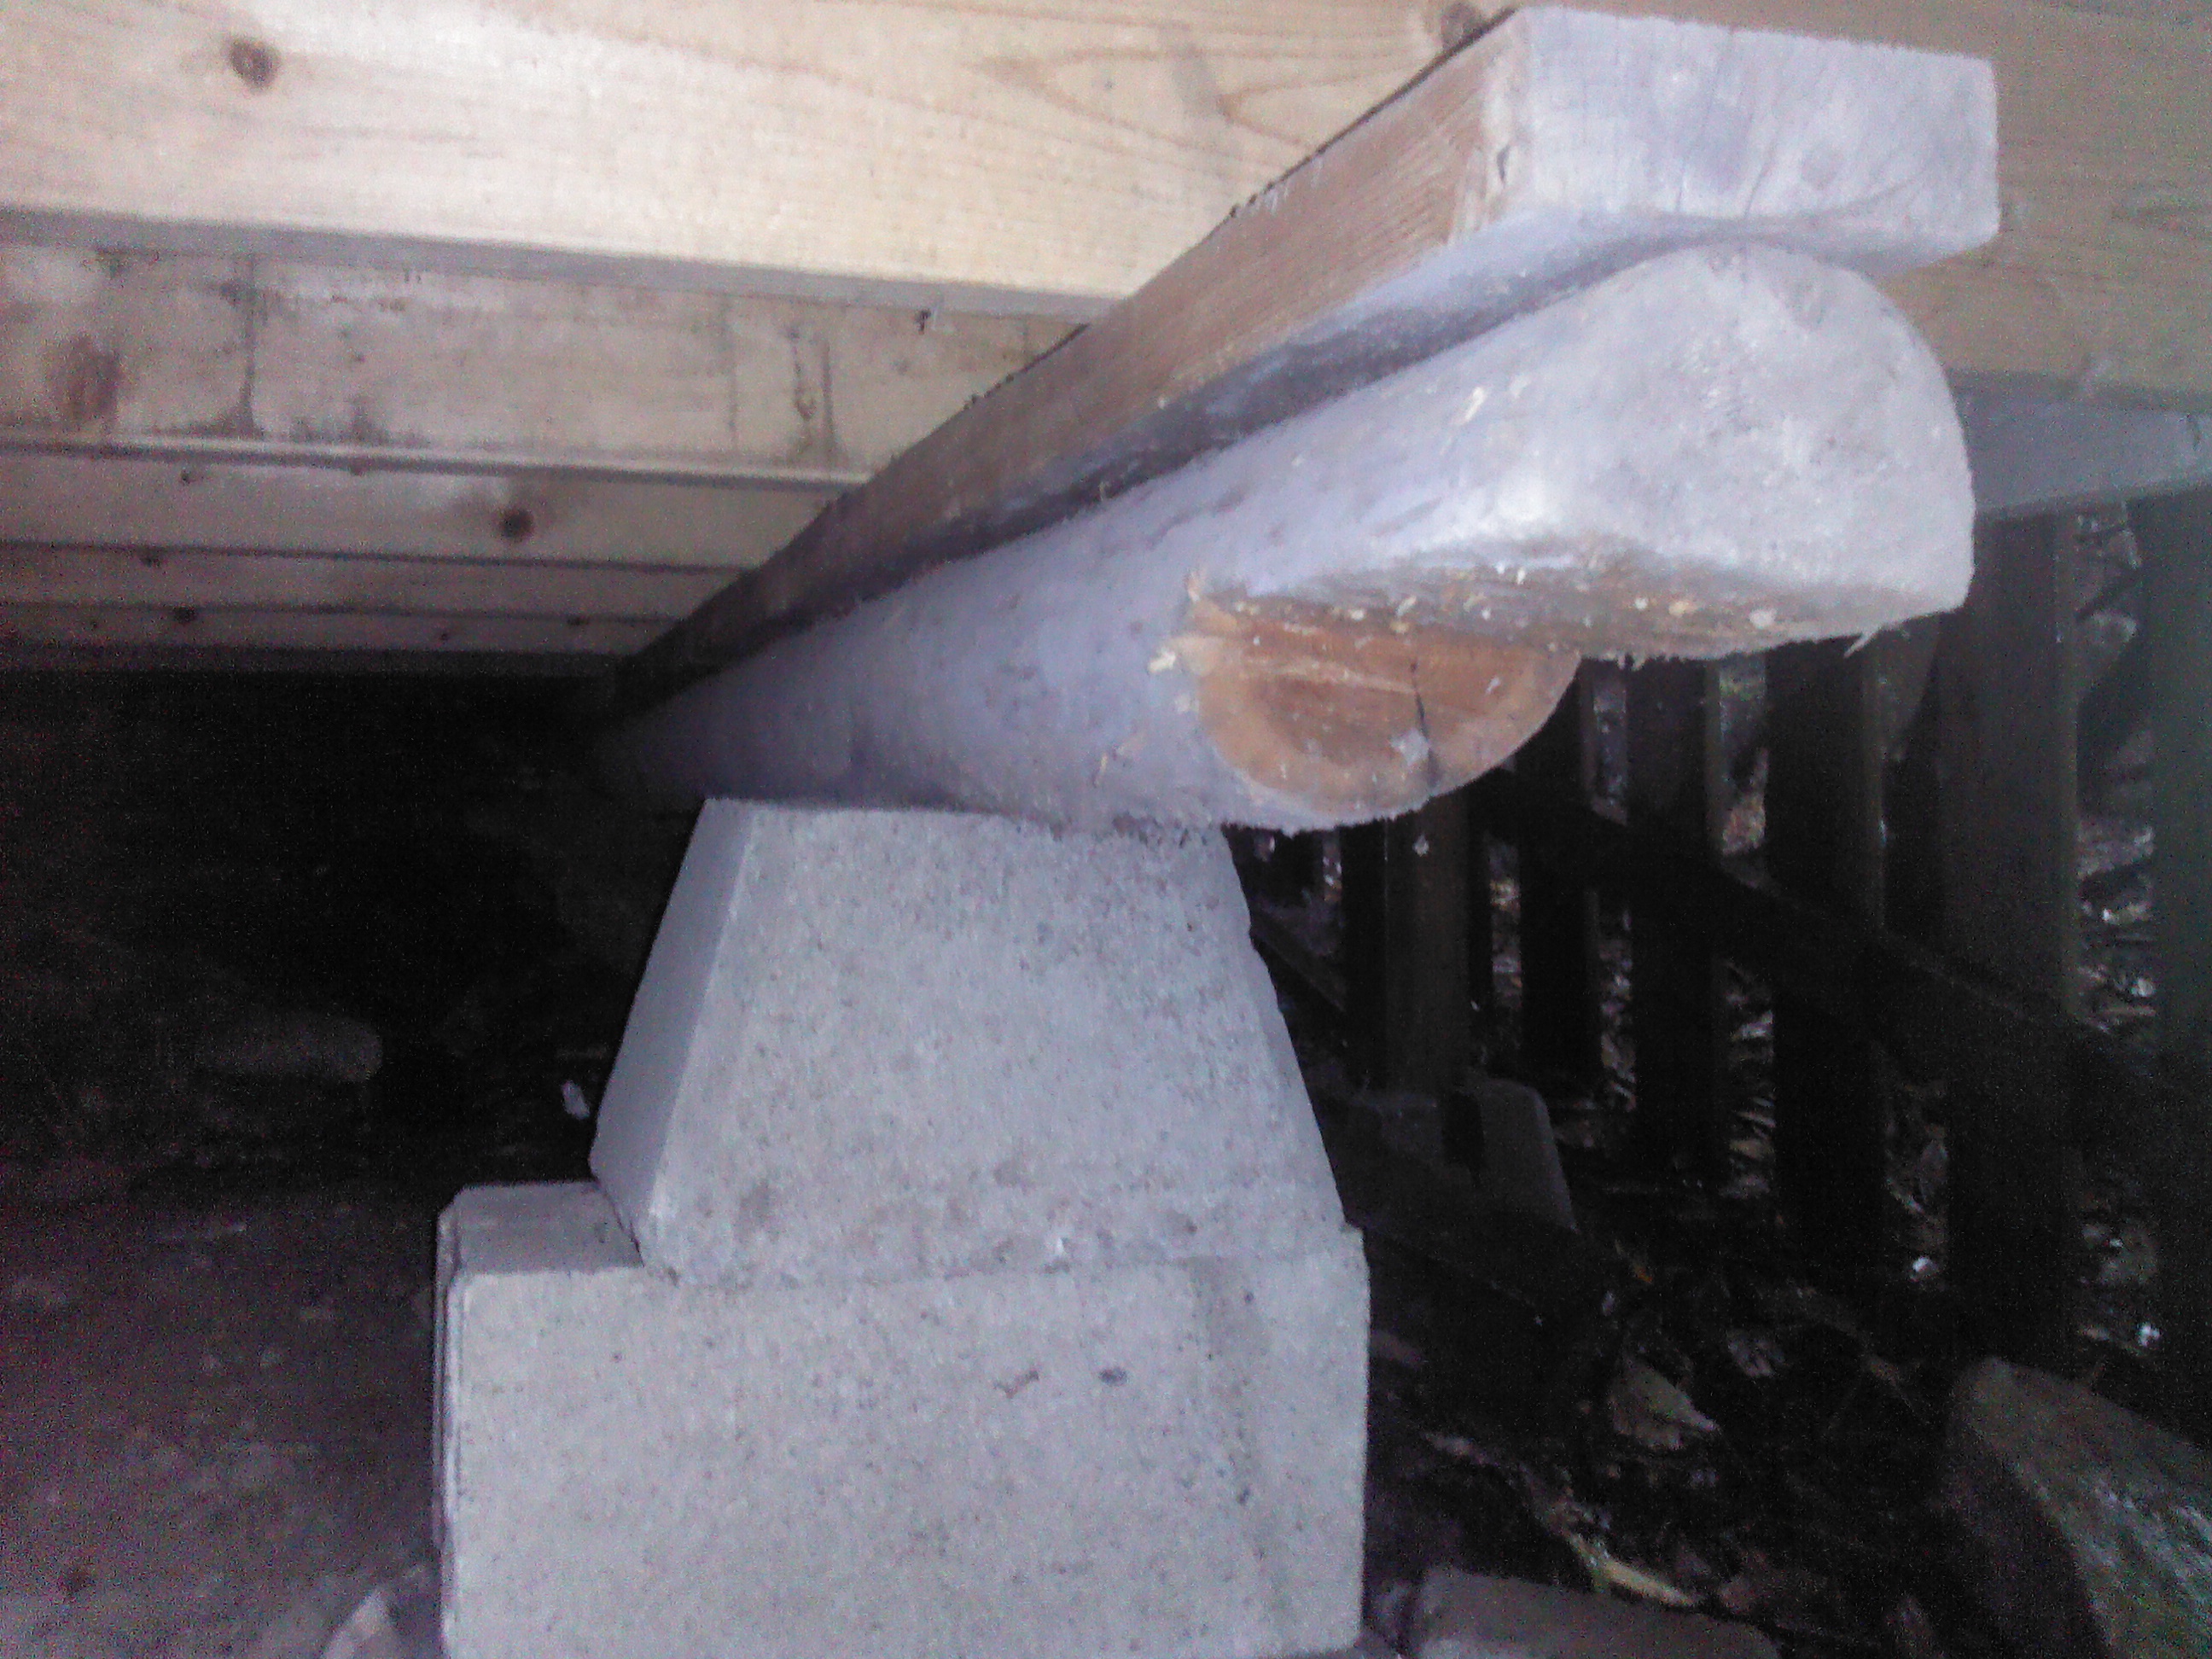
A VERY Dangerous Shed Support
This was the worst support for a building I’ve ever seen. What you can’t see in the photo, is the bag of concrete beneath the bottom block. I recommended this be repaired RIGHT AWAY.
The buyer negotiated a nice deal with the sellers and will be moving in next month.
Heat Pumps and Illegal Plumbing in Fleetwood, Surrey – Featured Home Inspection
This week’s featured inspection is a large home in the Fleetwood area of Surrey.
The home was built in 2008 and featured a Heat Pump / High Efficiency gas furnace HVAC system.
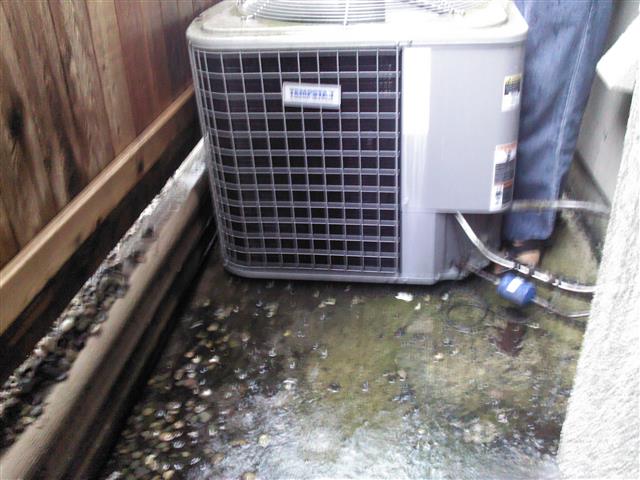
The heat pump condensing unit
The condensing unit was unlevel, which can cause problems with the compressor. I recommended the client remove the slope to prolong the compressor life. Otherwise the heating system was in great shape. TIP: If you have an A/C or Heat Pump unit in your home, change your filter monthly. Those little fins on the evaporator coil in the furnace get plugged easily.
This drain vent still had the cap on.
Here’s a classic defect that always makes me laugh – the builders never removed the protective cap from the vent stack. This stack hadn’t been venting properly for over five years! This is something that I have seen code inspectors miss many times. It’s also a great reason to walk the entire roof, and not just check from the end of a ladder.

An illegal S-trap
Someone had added a bathroom in the basement, but did not have a professional plumber perform the work – this drain line has got to go. An S-trap (Shaped like a sideways “S”) is actually a safety hazard – siphoning of the water can allow sewer gas (methane, sulfur gas) into the home. The owners had a large family and I always make a point of showing them any safety hazards after the inspection.
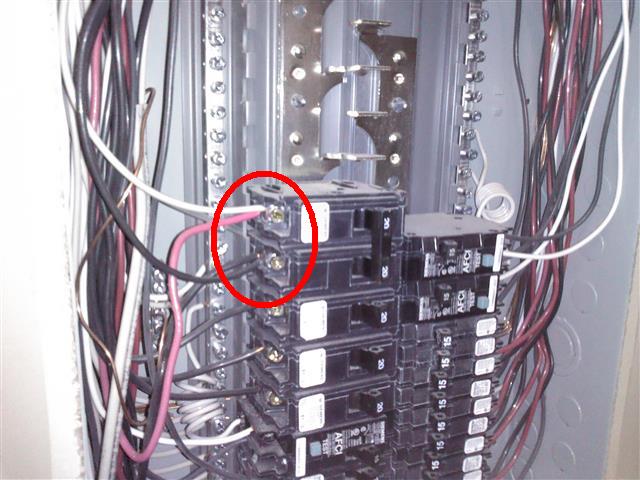
Double-Tapped Breakers at the Sub Panel
Finally, opening up the sub-panel revealed a double-tapped circuit. Double tapping (circled in red) is when two conductors share the same breaker terminal, which can overheat and cause a fire. This will actually be an easy fix, since there’s lots of room in the panel to add an additional breaker.
The client was thankful for the inspection and will be moving in a few months from now.
Time to Replace Your Washing Machine Hoses?
Short of fire, nothing causes more damage to the inside of a property than leaking water. It is estimated that 65% of property damage to stratas (homeowners associations) is caused by water leaking from failing pipes, hoses, plumbing fixtures and appliances. Washing machine hoses are a leading cause of residential water damage. Research shows that there are simple and inexpensive steps home owners and strata councils can take to prevent most of this damage.

This hose is about to burst.
When was the last time you checked your washing machine hoses? If you’re like most, this is a task that is frequently overlooked. Since they are barely visible (located behind the washing machine), they are out of sight and out of mind. The same holds true for dishwasher hoses. According to State Farm Insurance Statistics, washing machine hose failures cause approximately $170 million in damages to homes in the United States & Canada annually.
Washing machine hoses hold about 70 pounds of pressure. The rubber hoses weaken with age and do eventually burst if not replaced. In some cases, the hose connections can start to leak, giving an advanced warning sign. In other cases, there are no advance warnings and a sudden burst results. A bursting hose can displace 650 gallons of water per hour. If your home is unoccupied for 30 hours, this equates to 20,000 gallons – the average size of an in ground swimming pool!
Here are some preventative measures that you can take:
- Visibly check your hoses and their connections on a regular basis. Inspect for bulging hoses and corroding connections.
- Shut off both supply valves to the hot & cold water when not in use. This is only if you remember to turn the valves off each time you have finished using the washing machine.
- Install a Universal shut off valve. One lever at the water supply shuts off water to both the hot & cold hoses. Again, this is only as good as your memory to pull the lever off, each time you have finished using the washing machine.
- Replace the rubber hoses with braided hoses. These hoses are reinforced with steel braiding and this prevents bursting. However, these are not lifetime replacements. They can still wear out, especially at the connections.
When I find rubber hose connections to the washing machine, I recommend that the client replace them.
For further reading:
Pinhole Leaks in Copper Pipes
I inspect many condominiums and large buildings here in Vancouver. Often the inspection of the boiler room will reveal failure of the copper pipes, in the form of corrosion and pinhole leaks. This recent condo inspection turned up leakage on the hot water supply piping for the building:

A failing hot water pipe in a mechanical room
Corrosion like this may indicate a chronic problem throughout the building’s plumbing lines. Pinhole leaks are unfortunately a common occurrence for many homeowners, and, from my experience, there is a lot of misinformation regarding this problem.
What is a pinhole leak?
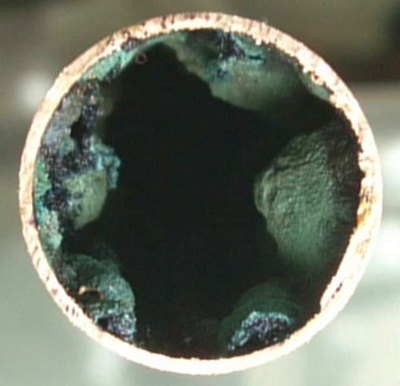
Cross section of a leaking pipe
A pinhole leak is the breakthrough of the pipe wall when the pipe is undergoing “pitting corrosion” or simply “pitting”. When enough pitting occurs in the interior of the pipe, it will break through and water will begin to travel to the exterior of the pipe.
What causes pinhole leaks?

Corrosion in the boiler room of a condo building.
Pitting corrosion (pinholes) are directly related to water chemistry. High or low pH balance and water softness/hardness (high/low mineral content of the water) will directly affect certain types of copper piping, and can cause accelerated corrosion. Vancouver, for example, has extremely soft water. The low mineral content has been blamed for poor protection from corrosion. For instance, in a hard-water region, the minerals in the water will form a protective layer on the interior of the pipe. Vancouver therefore suffers from greatly reduced copper lifespans.
What kinds of pipe are affected?
Hot water and heating supply lines are statistically more frequently damaged by pinhole leaks. The high temperature of the water can accelerate corrosion. Certain types of pitting will not occur in low water temperatures.
TIP: If you are inspecting a home or condominium, always have a look at the hot water lines near boilers/hot water tanks. Typically the hot water lines will fail before the cold lines.
What are the solutions?
Although there are several fixes for failed piping, the most obvious solution is to re-pipe the building. However, this is also the most expensive and destructive of the options. With the advent of flexible, easy-to-install PEX (Plastic piping), it is easier and more cost-effective than replacing with new copper lines, however significant damage to the interior walls is still often necessary.
Epoxy coating is a newer method that coats the interior walls of the pipe with a sealant. The system is shut down, water drained, and the coating pumped in. The advantage to this system is the lower downtime needed VS replacing the pipes. It is also less costly than re-piping.
UPDATE: After posting this article, I was contacted by Randy at CuraFlo BC, a company that specializes in epoxy coating. He answered several questions about epoxy lining, including addressing the common perception that the epoxy linings will fail prematurely. According to CuraFlo, there was some faulty product used prior to 2004, however their newest lining material, “CuraPoxy” has an extremely long service life up to 50 years. I will be providing more information on this system in a future blog post. Thanks Randy!

A chemical water treatment system.
Water treatment is the lowest-cost option. A chemical injector is installed on the water lines which injects a corrosion-inhibitor into the water as it passes through. This is a popular option for large buildings where re-piping would be extremely costly. Although it will not repair existing holes, the companies selling these products claim it will stop further corrosion from occurring. The downside to this system is the ongoing cost for injector and chemicals. It is also unclear whether these systems are a reasonable long-term solution.
One company offering water treatment in Vancouver is Hytec Water Management. I see many of these systems installed and strata owners seem to be happy with their performance.
What else can I do?
One word of advice: NEVER drain a copper pipe suffering from pinhole leaks. Draining and re-pressurizing a copper pipe may cause debris / mineral deposits sitting in pitted areas to loosen and cause a multitude of new leaks.
Further Information
For more information on this subject, visit the EPA website at http://www.epa.gov/sciencematters/april2011/leaks.htm
CuraFlo BC – CuraFlo BC
Extending the Life of Your Hot Water Tank
Hot water tanks, whether gas or electric, utilize something called a sacrificial anode rod. The rod (or rods, depending on the make and model of the water heater) acts to prevent the shell of the tank from corroding (rusting) by being made from a material that is susceptible to galvanic corrosion more easily than the shell. Simply put, the rod dissolves and your tank does not.

Old vs New Anode Rods
Life
A typical anode rod by itself will last about six years. If you have two anode rods, you can expect your tank to last between 8-12 years. Some tanks will go the distance – in my inspections I have seen water heaters still functioning as old as 22 years.
Different Types
Aluminum
Aluminum anode rods are best for places with hard water. The aluminum rod will withstand harder water than any other type. Aluminum may be a health problem, so to be safe you may not want to drink hot water and make sure to run some cold water through the faucet spout before drinking the water. Keep in mind, our sodas come in aluminum cans too.
Magnesium
Magnesium anode rods are the most common type of anode rod. They are used in places where water is softer. They do not last very long when you have hard water, a couple years at best. This is the main reason water heaters don’t last long after the anode rod is eaten up.
Zinc
Zinc anode rods are really just aluminum anode rods with a small portion being zinc. The ratio of zinc to aluminum is 1:10. The reason zinc is added is to combat any sulfur smell coming from the water. A new water heater is never installed with a zinc anode rod already in it, but it is a good upgrade if you experience rotten egg smell coming from your hot water.
Replacing Anode Rods
Replacing the anode rod in a water heater before it fails can slow down corrosion inside the tank and significantly extend the life of the water heater, sometimes even doubling it.
Depending on water conditions, an anode can last longer than normal, but many localities treat their water, which can have significant effect on the life of your heater and the anode. Sometimes water conditioning may accelerate the rate at which the anode rod is consumed. In other words, checking the anode should be a routine maintenance task.
An Excellent DIY Video can be found here: http://www.youtube.com/watch?v=97ett_HNu4k
As with all Home Improvements, if you are not comfortable with performing the work, please contact a licensed professional in your area.
Estimated Life Expectancy Chart for Homes
|
ADHESIVES, CAULK & PAINTS
|
YEARS
|
|---|---|
| Caulking (interior & exterior) | 5 to 10 |
| Construction Glue | 20+ |
| Paint (exterior) | 7 to 10 |
| Paint (interior) | 10 to 15 |
| Roofing Adhesives/Cements | 15+ |
| Sealants | 8 |
| Stains | 3 to 8 |
| APPLIANCES | YEARS |
| Air Conditioner (window) | 5 to 7 |
| Compactor (trash) | 6 |
| Dehumidifier | 8 |
| Dishwasher | 9 |
| Disposal (food waste) | 12 |
| Dryer Vent (plastic) | 5 |
| Dryer Vent (steel) | 20 |
| Dryer (clothes) | 13 |
| Exhaust Fans | 10 |
| Freezer | 10 to 20 |
| Gas Oven | 10 to 18 |
| Hand Dryer | 10 to 12 |
| Humidifier (portable) | 8 |
| Microwave Oven | 9 |
| Range/Oven Hood | 14 |
| Electric Range | 13 to 15 |
| Gas Range | 15 to 17 |
| Refrigerator | 9 to 13 |
| Swamp Cooler | 5 to 15 |
| Washing Machine | 5 to 15 |
| Whole-House Vacuum System | 20 |
| CABINETRY & STORAGE | YEARS |
| Bathroom Cabinets | 50+ |
| Closet Shelves | 100+ |
| Entertainment Center/Home Office | 10 |
| Garage/Laundry Cabinets | 70+ |
| Kitchen Cabinets | 50 |
| Medicine Cabinet | 25+ |
| Modular (stock manufacturing-type) | 50 |
| CEILINGS & WALLS |
YEARS |
| Acoustical Tile Ceiling | 40+ (older than 25 years may contain asbestos) |
| Ceramic Tile | 70+ |
| Concrete | 75+ |
| Gypsum | 75 |
| Wood Paneling | 20 to 50 |
| Suspended Ceiling | 25+ |
| COUNTERTOPS | YEARS |
| Concrete | 50 |
| Cultured Marble | 20 |
| Natural Stone | 100+ |
| Laminate | 20 to 30 |
| Resin | 10+ |
| Tile | 100+ |
| Wood | 100+ |
| DECKS | YEARS |
| Deck Planks | 15 |
| Composite | 8 to 25 |
| Structural Wood | 10 to 30 |
| DOORS | YEARS |
| Closet (interior) | 100+ |
| Fiberglass (exterior) | 100+ |
| Fire-Rated Steel (exterior) | 100+ |
| French (interior) | 30 to 50 |
| Screen (exterior) | 30 |
| Sliding Glass/Patio (exterior) | 20 (for roller wheel/track repair/replacement) |
| Vinyl (exterior) | 20 |
| Wood (exterior) | 100+ |
| Wood (hollow-core interior) | 20 to 30 |
| Wood (solid-core interior) | 30 to 100+ |
| ELECTRICAL | YEARS |
| Accessories | 10+ |
| Arc-Fault Circuit Interrupters (AFCIs) | 30 |
| Bare Copper | 100+ |
| Bulbs (compact fluorescent) | 8,000 to 10,000+ hours |
| Bulbs (halogen) | 4,000 to 8,000+ hours |
| Bulbs (incandescent) | 1,000 to 2,000+ hours |
| Bulbs (LED) | 30,000 to 50,000+ hours |
| Copper-Clad Aluminum | 100+ |
| Copper-Plated | 100+ |
| Fixtures | 40 |
| Ground-Fault Circuit Interrupters (GFCIs) | up to 30 |
| Lighting Controls | 30+ |
| Residential Propane Backup Generators | 12 |
| Service Panel | 60 |
| Solar Panels | 20 to 30 |
| Solar System Batteries | 3 to 12 |
| Wind Turbine Generators | 20 |
| ENGINEERED LUMBER | YEARS |
| Engineered Joists | 80+ |
| Laminated Strand Lumber | 100+ |
| Laminated Veneer Lumber | 80+ |
| Trusses | 100+ |
|
FASTENERS, CONNECTORS & STEEL
|
YEARS
|
|---|---|
| Adjustable Steel Columns | 50+ |
| Fasteners (bright) | 25 to 60 |
| Fasteners (copper) | 65 to 80+ |
| Fasteners (galvanized) | 10+ |
| Fasteners (electro-galvanized) | 15 to 45 |
| Fasteners (hot-dipped galvanized) | 35 to 60 |
| Fasteners (stainless) | 65 to 100+ |
| Steel Beams | 200+ |
| Steel Columns | 100+ |
| Steel Plates | 100+ |
| FLOORING | YEARS |
| All Wood Floors | 100+ |
| Bamboo | 100+ |
| Brick Pavers | 100+ |
| Carpet | 8 to 10 |
| Concrete | 50+ |
| Engineered Wood | 50+ |
| Exotic Wood | 100+ |
| Granite | 100+ |
| Laminate | 15 to 25 |
| Linoleum | 25 |
| Marble | 100+ |
| Other Domestic Wood | 100+ |
| Slate | 100 |
| Terrazzo | 75+ |
| Tile | 75 to 100 |
| Vinyl | 25 |
| FOUNDATIONS | YEARS |
| Baseboard Waterproofing System | 50 |
| Bituminous-Coating Waterproofing | 10 |
| Concrete Block | 100+ |
| Insulated Concrete Forms (ICFs) | 100 |
| Post and Pier | 20 to 65 |
| Post and Tensioned Slab on Grade | 100+ |
| Poured-Concrete Footings and Foundation | 100+ |
| Slab on Grade (concrete) | 100 |
| Wood Foundation | 5 to 40 |
| Permanent Wood Foundation (PWF; treated) | 75 |
| FRAMING | YEARS |
| Log | 80 to 200 |
| Poured-Concrete Systems | 100+ |
| Steel | 100+ |
| Structural Insulated Panels (SIPs) | 100+ |
| Timber Frame | 100+ |
| GARAGES | YEARS |
| Garage Doors | 20 to 25 |
| Garage Door Openers | 10 to 15 |
| HOME TECHNOLOGY | YEARS |
| Built-In Audio | 20 |
| Carbon Monoxide Detectors* | 5 |
| Door Bells | 45 |
| Home Automation System | 5 to 50 |
| Intercoms | 20 |
| Security System | 5 to 20 |
| Smoke/Heat Detectors* | less than 10 |
| Wireless Home Networks | 5+ |
| HVAC | YEARS |
| Air Conditioner (central) | 7 to 15 |
| Air Exchanger | 15 |
| Attic Fan | 15 to 25 |
| Boiler | 40 |
| Burner | 10+ |
| Ceiling Fan | 5 to 10 |
| Condenser | 8 to 20 |
| Dampers | 20+ |
| Dehumidifier | 8 |
| Diffusers, Grilles and Registers | 25 |
| Ducting | 60 to 100 |
| Electric Radiant Heater | 40 |
| Evaporator Cooler | 15 to 25 |
| Furnace | 15 to 25 |
| Gas Fireplace | 15 to 25 |
| Heat Exchanger | 10 to 15 |
| Heat Pump | 10 to 15 |
| Heat-Recovery Ventilator | 20 |
| Hot-Water and Steam-Radiant Boiler | 40 |
| Humidifier | 12 |
| Induction and Fan-Coil Units | 10 to 15 |
| Chimney Cap (concrete) | 100+ |
| Chimney Cap (metal) | 10 to 20 |
| Chimney Cap (mortar) | 15 |
| Chimney Flue Tile | 40 to 120 |
| Thermostats | 35 |
| Ventilator | 7 |
| INSULATION & INFILTRATION BARRIERS | YEARS |
| Batts/Rolls | 100+ |
| Black Paper (felt paper) | 15 to 30 |
| Cellulose | 100+ |
| Fiberglass | 100+ |
| Foamboard | 100+ |
| Housewrap | 80+ |
| Liquid-Applied Membrane | 50 |
| Loose-Fill | 100+ |
| Rock Wool | 100+ |
| Wrap Tape | 80+ |
| MASONRY & CONCRETE | YEARS |
| Brick | 100+ |
| Insulated Concrete Forms (hybrid block) | 100+ |
| Concrete Masonry Units (CMUs) | 100+ |
| Man-Made Stone | 25 |
| Masonry Sealant | 2 to 20 |
| Stone | 100+ |
| Stucco/EIFS | 50+ |
| Veneer | 100+ |
| MOLDING, MILLWORK & TRIM | YEARS |
| Attic Stairs (pull-down) | 50 |
| Custom Millwork | 100+ |
| Pre-Built Stairs | 100+ |
| Stair Parts | 100+ |
| Stairs | 100+ |
| PANELS | YEARS |
| Flooring Underlayment | 25 |
| Hardboard | 40 |
| Particleboard | 60 |
| Plywood | 100 |
| Softwood | 30 |
| Oriented Strand Board (OSB) | 60 |
| Wall Panels | 100+ |
| PLUMBING, FIXTURES & FAUCETS | YEARS |
| ABS and PVC Waste Pipe | 50 to 80 |
| Accessible/ADA Handles | 100+ |
| Acrylic Kitchen Sink | 50 |
| Cast-Iron Bathtub | 100 |
| Cast-Iron Waste Pipe (above ground) | 60 |
| Cast-Iron Waste Pipe (below ground) | 50 to 60 |
| Concrete Waste Pipe | 100+ |
| Copper Water Lines | 70 |
| Enameled Steel Kitchen Sink | 5 to 10+ |
| Faucets and Spray Hose | 15 to 20 |
| Fiberglass Bathtub and Shower | 20 |
| Gas Lines (black steel) | 75 |
| Gas Lines (flex) | 30 |
| Hose Bibs | 20 to 30 |
| Instant (on-demand) Water Heater | 10 |
| PEX | 40 |
| Plastic Water Lines | 75 |
| Saunas/Steam Room | 15 to 20 |
| Sewer Grinder Pump | 10 |
| Shower Enclosure/Module | 50 |
| Shower Doors | 20 |
| Showerheads | 100+ (if not clogged by mineral/other deposits) |
| Soapstone Kitchen Sink | 100+ |
| Sump Pump | 7 |
| Toilet Tank Components | 5 |
| Toilets, Bidets and Urinals | 100+ |
| Vent Fan (ceiling) | 5 to 10 |
| Vessel Sink (stone, glass, porcelain, copper) | 5 to 20+ |
| Water Heater (conventional) | 6 to 12 |
| Water Line (copper) | 50 |
| Water Line (plastic) | 50 |
| Well Pump | 15 |
| Water Softener | 20 |
| Whirlpool Tub | 20 to 50 |
|
RADON SYSTEMS
|
YEARS
|
|---|---|
| Air Exchanger | 15 |
| Barometric Backdraft Damper/Fresh-Air Intake | 20 |
| Caulking | 5 to 10 |
| Labeling | 25 |
| Manometer | 15 |
| Piping | 50+ |
| Radon Fan | 5 to 8 |
| ROOFING | YEARS |
| Aluminum Coating | 3 to 7 |
| Asphalt Shingles (3-tab) | 20 |
| Asphalt (architectural) | 30 |
| BUR (built-up roofing) | 30 |
| Clay/Concrete | 100+ |
| Coal and Tar | 30 |
| Copper | 70+ |
| EPDM (ethylene propylene diene monomer) Rubber | 15 to 25 |
| Fiber Cement | 25 |
| Green (vegetation-covered) | 5 to 40 |
| Metal | 40 to 80 |
| Modified Bitumen | 20 |
| Simulated Slate | 10 to 35 |
| Slate | 60 to 150 |
| TPO | 7 to 20 |
| Wood | 25 |
| SIDINGS, FLASHING & ACCESSORIES | YEARS |
| Aluminum Siding | 25 to 40+ |
| Aluminum Gutters, Downspouts, Soffit and Fascia | 20 to 40+ |
| Asbestos Shingle | 100 |
| Brick | 100+ |
| Cementitious | 100+ |
| Copper Downspouts | 100 |
| Copper Gutters | 50+ |
| Engineered Wood | 100+ |
| Fiber Cement | 100+ |
| Galvanized Steel Gutters/Downspouts | 20 |
| Manufactured Stone | 100+ |
| Stone | 100+ |
| Stucco/EIFS | 50+ |
| Trim | 25 |
| Vinyl Siding | 60 |
| Vinyl Gutters and Downspouts | 25+ |
| Wood/Exterior Shutters | 20 |
| SITE & LANDSCAPING | YEARS |
| American Red Clay | 100+ |
| Asphalt Driveway | 15 to 20 |
| Brick and Concrete Patio | 15 to 25 |
| Clay Paving | 100+ |
| Concrete Walks | 40 to 50 |
| Controllers | 15 |
| Gravel Walks | 4 to 6 |
| Mulch | 1 to 2 |
| Polyvinyl Fencing | 100+ |
| Sprinkler Heads | 10 to 14 |
| Underground PVC Piping | 60+ |
| Valves | 20 |
| Wood Chips | 1 to 5 |
| Wood Fencing | 20 |
| SWIMMING POOLS |
YEARS |
| Concrete Shell | 25+ |
| Cover | 7 |
| Diving Board | 10 |
| Filter and Pump | 10 |
| Interior Finish | 10 to 35 |
| Vinyl Liner | 10 |
| Pool Water Heater | 8 |
| Waterline Tile | 15+ |
| WINDOWS | YEARS |
| Aluminum/Aluminum-Clad | 15 to 20 |
| Double-Pane | 8 to 20 |
| Skylights | 10 to 20 |
| Window Glazing | 10+ |
| Vinyl Windows | 20 to 40 |
| Wood | 30+ |
Note: Life expectancy varies with usage, weather, installation, maintenance and quality of materials. This list should be used only as a general guideline and not as a guarantee or warranty regarding the performance or life expectancy of any appliance, product, system or component.
From InterNACHI’s Standard Estimated Life Expectancy Chart for Homes – InterNACHI http://www.nachi.org/life-expectancy.htm#ixzz2P3r65Oa6
Buying a Condo in Vancouver
Buying a condo in Vancouver can be exciting and confusing. If you are ready to purchase a condo, have a look at the information below – it may save you time and money!

1. Consider only an Independent Inspector who is not related to any party involved in the buying process.
2. Please provide your inspector with the MLS listing #. We consider it as important to review the listing agent’s description of he property. This is important, because, you may come along descriptions, such as new “rain screen” wall design. However, when inspecting the exterior walls it is sometimes discovered that only one single wall got repaired. The buyer may face the danger of facing eventually large unexpected assessments to pay for these deficiencies.
3. We recommend that you receive a copy of the Property Disclosure Statement (PDS), since this is an important document. The PDS will tell you in writing what your entitlements (e.g. locker / parking space) are. The PDS will also advise you who to contact on council if you require more information before removing your subject clauses.
4. We highly recommend that you review the Information Certificate (Form B). This is a very important document. It will advise, amongst other things, how much money is in the Constituency Reserve Fund (CRF). This is an emergency account. Under the Strata Property Act the owners are obliged to contribute a certain percentage of their maintenance fees, to cover large expenditures. Some examples would be re-plumbing, asbestos removal, building envelope repair or roof replacement.
You may be informed that there is a large emergency fund. You may learn that the STRATA has the amount of $X. We always recommend a simple test to determine just how much money is available in their CRF per unit.
Divide amount in the CRF by the number of units.
Number of units: 200
CRF = $250,000
Available per unit: $ 1,250
5. We also consider an additional figure for many condo buyers, purchasing a home where they actually want to live in, as extremely important. How many renters are living in the complex and is there a bylaw in place to regulate renting. This must also be considered as important in case you are looking for an investment property.
6. We recommend to our clients that you kindly ask your realtor to write into your Contract for Purchase that you are to receive copies of all Engineers and “Other Contractors” reports that have been submitted to the STRATA council over the last six (6) years.
7. We would like to advise you to read all minutes carefully. Please note that The Homeowners Protection Office recommends that for older buildings and especially for structures with face sealed stucco and the once which already got partially repaired, the STRATA should have an annual building envelope inspection performed by a professional building envelope specialist.
According to Canada Mortgage and Housing Corporation (CMHC) buyers who did not request and read all the documents mentioned before, received notice for special assessments up to $200,000 within one year of purchase. CMHC also says, that many first time home buyers did not understand many of the information they were reading. Please ask your realtor any questions you may have. He is the professional who deals with these subjects on a daily basis.
8. We advise you to be careful in case you come along a realtor who advises you against an inspection. In case a realtor is trying to influence you, please be aware and follow your instinct. You want to protect the largest investment you probably make in your lifetime.
Author David Fairbairn has years of experience with Strata corporations, Leaky Condo remediation and commercial buildings. Trust him to perform your Condo Inspection! Call 604 395-2795 or email him at david@fairbairninspections.com
How to Spot a Vancouver Leaky Condo From the Street
Leaky Condos are infamous in Vancouver, and rightfully so – they’ve cost homeowners, businesses and developers millions of dollars and caused heartbreak and frustration for almost twenty years. Here’s five minutes worth of reading that can save you countless hours of frustration.
Everything you need to know about Leaky Condos:
1). Leaky condos were built between 1982 and 1999. The building code changed around 2000 to require rain screens in stucco buildings.
2). Most leaky condos have stucco cladding. Stucco was popular during the Vancouver housing boom. The only problem is that it was installed face-sealed, which means it was installed tight against the building, with no cavity for water to drain from.
3). Leaky condos lack a rain-screen assembly: A rain-screen assembly is a thin cavity between the building and the stucco that allows air and moisture to flow – and not get held against the building to cause rot.
4). They kept being built because it took a long time for the problem to show up. By the time the industry realized what was going on, years had passed and thousands of buildings had been built with this faulty design.
5). Vancouver has high annual rainfall. This is key – in California there are many similar building designs – but with much less annual rainfall, their buildings tend to perform much better.
6). Problem buildings are easy to spot from the street. Take a look at the below photos.

A condo with a partial rain screen
In the above picture we can see expansion joints with flashings on the right-hand wall, between the floors.
A non rain screened elevation on the same building
In this picture we can see another wall from the same building – but no flashings.
The wall in the right side of the first photo has been rain screened. The wall in the second photo has not, and is face-sealed EIFS (Exterior Insulated Finishing System, also known as “Synthetic Stucco”)
This particular building had the east wall fail (and leak), but the strata elected to only remediate the one wall, instead of the entire building. However, this may be postponing the inevitable, as the other walls could eventually fail as well, and they will need to be repaired.
Rainscreening an entire building like this would cost millions of dollars, which will need to be paid by every owner. It is not uncommon to see strata owners have to pay enormous special levies for these types of projects.
Hopefully this article has helped you identify a rain-screened building. Knowing the difference will be beneficial when house-hunting in Vancouver.
Author David Fairbairn is a certified, licensed home inspector serving Vancouver and the Lower Mainland. He has spent years working with Stratas on leaky condo projects, and holds a Power Engineering License in BC. Why not give him a call for your next Home Inspection?
Call 604 395-2795 or email david@fairbairninspections.com today!
Truss Uplift – Why Are There Cracks in Your Ceiling?

Truss uplift is a phenomenon that occurs in a home with a truss roof system (see above picture). In cold weather the bottom chord of the truss stays warmer and drier than the other the members, because it is closer to the heated area below. The other members expand at a different rate than the bottom chord, so it bows upwards, pulling the ceiling up with it.
It looks like this from inside:

Yikes – someone seeing that for the first time might assume that it is a serious structural problem! Don’t worry, though; there are ways to correct it without major expense.
SOLUTIONS
There are a few solutions for this problem:
1. Adequate Attic Ventilation: By preventing a build-up of moisture in the attic, you effectively control expansion of the wood framing members, and lessen their movement during cold/hot weather.
2. Install Sliding Clips: These brackets allow the truss to move up and down without pulling anything along with it.

3: During Construction: Some builders are securing the ceiling drywall to the top of the walls, and not attaching to trusses for a distance of 18 inches from any wall.
4. Install crown moldings, but fasten them to the ceiling only, not the wall. Then when the ceiling moves the molding travels up and down with it, hiding the movement! This is also a good excuse to impress visitors with your interior design skills.
Does your home inspector know what to look for when he sees a crack in the ceiling?
About the Author: David Fairbairn is a licensed, insured, Certified Home Inspector in the province of BC. and holds a certificate in home inspection from Ashton College in Vancouver.
He is also a licensed Power Engineer in BC, and holds a certificate in power engineering from the McPhail school of Energy at SAIT in Alberta. He has been involved in the construction, maintenance and repair of luxury and high-end commercial buildings in downtown Vancouver for many years.
He has a common-sense approach to building science and an innate ability to explain complicated concepts in clear terms.
Call now to book your home inspection! 604 395-2795