
All posts by DavidFairbairn
How Does Thermal Imaging (Infrared) Help In Home Inspections? | Featured Video
Mark: Hi, it’s Mark Bossert from Top Local Lead Generation. We’re here with David Fairbairn from Fairbairn Inspections in Vancouver. David how’re you doing today?
David: I’m great Mark, how’re you doing?
Mark: Good. So we’re going to be talking about thermal imaging and how does thermal imaging help you in doing home inspections?
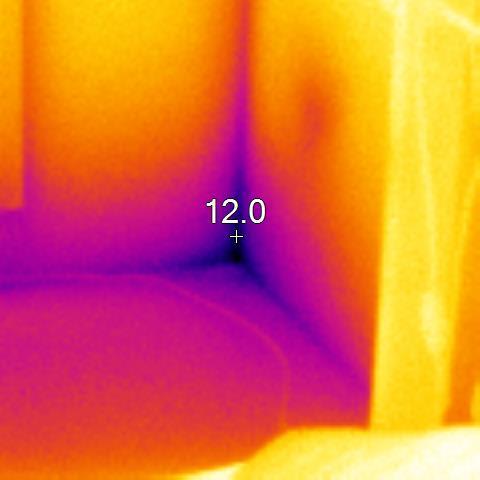
David: Well, Mark someone mentioned relatively, I’m not going to say new technology, it’s actually be around for a while but the concept is that we can actually get to the point now where we can read heat signatures on dry wall, ceilings, walls, things like that we can actually determine if there’s hidden moisture or if there’s hidden, you know sometimes we find missing insulation, sometimes we can find electrical overheating, so it’s just really nice technology and we’re sort of seeing this come into the home inspection industry and to be honest with you Mark we’re getting a lot of people asking for it. We offer thermal imaging as a package with our home inspections and it’s getting a lot of interest from potential home buyers who basically want to get that extra level of seeing what our eyes can’t see. Now a thermal camera is basically a camera that can read infra-red light; infra-red light is given off by objects in proportion to how much heat energy they have, so if we had an object that, maybe we have a cold spot in a wall, we might not be able to see that with our own eyes but that could be a leak, it could be something where we’ve got some water running down the inside the wall and it’s on the back of the dry wall and you know we may not be able to see that during standard visual home inspections, so the thermal imaging just gives us that extra insight into the property and I like to say it’s the most detailed inspection you can get. So my advice would be if you’re looking for a home inspector try to find somebody who can offer the thermal imaging and if you want the best inspection out there get the thermal imaging package because it’s going to give you that extra insight into the property and most of the time, I’m not going to say all the time, but most of the time it ends up paying for itself in terms of saving you on repair costs.
Mark: So, when you’re looking and finding say a cold spot in a place where it shouldn’t be or a hot spot, but let’s just talk about a cold spot, what does that lead you to look for further, like how does that help you to do a better job?
David: Yeah, it helps us to a better job because we might not have caught that otherwise, you know if I’m walking through with a flash light, looking at your walls and looking at your ceilings and I’m going, you know what, it looks pretty good, I don’t see any signs of moisture coming through the wall, I have no idea if there’s insulation in the wall but with the thermal camera, and I’ll give you an example Mark. A new construction home, the builder asks to get all the insulation in, wheels leave the driveway and all of a sudden these guys leaves the insulation out, falls out, we’ll just give them the benefit of the doubt, we can take an image of that wall and see there’s actually heat loss maybe in one of the stud bays, so we can actually tell, o.k. you may not actually have insulation here, let’s do some further review. In which case we’re going to recommend a contractor come in, so an example would be a house I did in south Surrey a little while ago. They had a vaulted ceiling so there was no attic space to actually see with our eyes so what we did, we thermally scanned that ceiling and sure enough we see a big drip coming right down the middle of the ceiling and it wasn’t showing through the dry wall yet, it was running on the top of the vapour barrier and we recommended a roofer come out and sure enough after they did water test, there was actually water in the ceiling. It was a relatively new roof and they didn’t know it leaked yet and we actually surprised the home owners. They had no idea.
Mark: And it saved the buyers probably a ton of money in terms of not buying something that they would have to repair after the fact.
David: That’s right. I think they save about four or five hundred dollars on that one. It was a failed flashing. The thermal imaging package, I think they paid about 79 bucks for it, so it’s a pretty good return on their investment.
Mark: So does this increase the time it takes you to do an inspection? Like how long does it take?
David: It does, it takes a little bit longer but one of the main things we want to do in order to get a quality thermal image, Mark is to heat up the house or alternately, depending on the outdoor air temperature, we might run the air conditioning and we’re going to run the heating/cooling system to get those interior conditions just right to get the best image possible so that takes a little bit more time, a little bit more intrusive but you know I feel it’s worth it and usually it only adds about thirty minutes to the whole inspection time. In a condominium it might add about fifteen minutes to the whole inspection. It can be done fairly easily and of course the buyers really enjoy seeing it. We take it out and we scan the, in one case a little while ago, we could actually see the dry wall screws everywhere in the ceiling so we can actually tell the nailing pattern that they’ve done and of course we can tell where the joists are; if you want to remove a load bearing wall, we may not know it’s a load bearing wall, we can actually see, o.k. well we’ve got a beam here, we’ve got a couple trusses here and you can actually see the structure of the building. It’s quite cool.
Mark: So how much does it cost?
David: For condominiums, the thermal imaging package is $39 plus tax, in addition to the cost of the inspection, for a home depending on the size it can run anywhere from about $79 to $99 extra for the thermal image package. That includes electrical panel scanning, that includes ceilings, walls, floors; we’re going to check for missing insulation, and there’s a few other important things that we’re going to check for that’s really specific for instance if you have a two story building and you’ve got some bathrooms on the second floor, you’ll notice I actually have some drywall on me right now, we actually just did a thermal scan of a house in Coquitlam this morning and the bathtub had not been used in twenty years, it actually leaked into the ceiling and we scanned of course and we found a big leak in the ceiling, cut it out and water came out. So this is the kind of thing we’re finding with thermal imaging, we have no idea otherwise. They’re saving about a thousand bucks on that one, so the 79 or 99 is a pretty good deal.
Mark: Well I think for me, the money saved is nice but not having the wonderfulness of moving into a brand new home to you, new to you home, and then having all kinds of problems happening that you did not expect, surprise, that takes all the joy out of, hey, we love our new home.
David: That’s right. We try to make the inspection a fun part of the home buying process where, you know what, we are just there to find, to make sure there’s no surprise when you move in and it’s also an education on the house so we’re going to identify the defects plus identify what you do have there, positive points in the house so you have that well rounded knowledge and the biggest things is when you move in there’s no surprise, that’s right.
Mark: Awesome. So, we’ve been talking about thermal imaging and how it helps in home inspections and it sounds like it’s a pretty important part of your tool kit these days. Thanks a lot David.
David: Thanks Mark.
Mark: Talk to you next week.
Can You Install a New Roof Over an Old One? | Fairbairn Home Inspections
When it comes time to replace a roof, homeowners will likely be looking at several different products, and different roofing companies to perform the work. Often, a roofing contractor gives a quote which is much lower than anyone else. This is often a red flag; they may install an inferior material, surprise you with a sudden jump in charges, or simply do the work wrong. One way I see this happen is “cutting back on costs” by not removing the existing roof first – they install the new roof over the old one.
In my career, I have never seen a satisfactory roof that has been installed over an existing one. There are a number of reasons for this…

A ten-year old roof that was failing due to overheating.
It works, but only for a short time.
Double-layer roofs will look good and perform well at first, but often for only a short amount of time. The photo above is from a roof that was only ten years old – far too young to fail this badly. This roof should have lasted 15-20 years.

The roof material overheats and fails.
Due to the poor ventilation of the underside of the new shingles, the shingles overheat in warm weather and deteriorate. This also creates problems with the attic structure/sheathing, which may become damaged.

This double-layered roof looks great now, but won’t last long.
It often voids the warranty.
Certain manufacturers prohibit double-layer installations, and will dishonor the warranty if a roof is incorrectly installed.

And finally, the most important reason not to double-layer a roof:
Double-layer roofs cost more to replace.
When the new roof inevitably fails, the roofers will need to remove twice as much material, meaning double the labour and double the disposal cost.

I strongly recommend against double-layer roofing – if you have a property that you think may have a problem roof, a professional home inspection is your best protection against unwanted surprises.
Give us a call for your next Home Inspection! – 604 395-2795
Fake Electrical Outlet in Langley Townhome | Featured Home Inspection
This week’s featured inspection is a Townhouse in Langley. The development was constructed in 2004, so it was just out of warranty. These townhomes usually feature a 2/5/10 warranty (2 years mechanical, 5 years envelope/leakage, and 10 years structure).

The rear balconies were in poor condition, particularly for a young building. There was extensive rot and deterioration of the balcony railings and trim, and in several units the actual deck posts were damaged – a safety concern.

The roof was a typical, asphalt “laminate” shingle, which have a service life of about 20 years. Note how the downspouts are extended so they run down the roof, into the gutters, instead of directing water onto the shingles. This will extend the roof life and is optional – the BC Building Code does not require these! I always point these out as a positive when I see them.

These units are typically heated with electric baseboard heaters. As part of our thorough Home Inspection, every baseboard heater is checked using an IR Thermometer. Electric baseboards provide reliable heat that rarely needs maintenance, which is perfect for a first-time home buyer.

The kitchen island featured a receptacle on the side, however when tested, there was no power to it.

A quick look inside the cabinet, and we can see that it’s a “dummy” receptacle which wasn’t even connected! The owner had started to install one (including drilling a hole through the floor for the wiring), and never finished. This is why we always check every receptacle when possible. (Note: The island was not installed permanently; it was free moving and could be slid around on the floor. Be careful to check if your island is secured before you buy).

Finally, the garage door was completely hacked to pieces. The owner explained that they had cut it in order to fit a storage rack in the garage – a strange repair and one that I have never seen before. The only way to fix this is to replace the door.
Outcome: The sellers negotiated a slight reduction on the price and will be moving in next month.
Call us for your next Langley Townhouse Inspection! – 604 395-2795
Are Homes Near Power Lines Dangerous? Home Inspector Blog
In the lower mainland, there are thousands of homes within viewing distance (and directly beside) High-Voltage transmission lines and towers. Such transmission arrangements are called “rights of way” (ROW) by BC Hydro. There are over 74,000 Kms of Power Lines in BC.
There is a large amount of controversy surrounding these ROWs, most notably due to the EMF (Electromagnetic Field) Radiation they create. Let’s take a look at some facts:
Transmission Voltages are Extremely High
Due to the great distances the electricity must be transmitted, a ROW will be between 69,000 to 500,000 Volts. At the high end, (250-500 Kilovolts), an audible buzzing and/or crackling sound may be noted. These voltages are obviously extremely dangerous and great care should be taken not to go anywhere near them.
A Map Showing The Bulk Transmission System in BC
Power Lines Can Move
Power lines may sway as much as 4 meters vertically during windy/bad weather. A fallen transmission line is disastrous, but luckily rarely occurs. If the home buyer is looking at a house directly beside a tower, this is a risk that they should take into consideration before purchasing the home.
No Buildings Permitted Below Them
Homes, Buildings, and even foundations may not be constructed on a ROW, or within 10 meters of one. However, golf courses (such as one in Surrey), sheds, roads, fences, and parking can be constructed with permission from BC Hydro.
Electromagnetic Fields (EMF)
EMF is a very real, physical field that is present around all electronic devices and the equipment powering them. EMF is everywhere electricity flows. However, some groups/individuals believe that EMF causes negative health effects in humans – most notably from Power Lines and “Smart Meters”, about which there has been much media coverage. There have been a number of studies performed, particularly one early study that linked childhood leukemia to EMF. Later, the National Cancer Institute (NCI) performed a study that failed to establish a link between elevated EMF levels and leukemia. Only several, long-term studies have been performed, and all have failed to establish a link between EMF and cancer.
Another suggested health effect is Hormonal disruption – there is a large amount of anecdotal evidence of Hormone-related problems in people living near power lines, however as of this article’s writing we are not aware of any conclusive studies linking the two.

So Are They Dangerous?
The most real, empirical danger involved with overhead power lines is in the risk of contact with High-Voltage equipment, either from collapse or from accidental contact with the equipment (kites, ladders, trees, etc.)
EMF Radiation has been proven to drop dramatically over short distances, and is already present in areas without overhead power lines (such as near cell towers, microwaves, cell phones, TVs, etc). There is also (so far) no conclusive link between EMF and serious health issues. However, if you feel uncomfortable with power lines nearby you should investigate/research the issue carefully before proceeding.
A Final Note…
A quality home inspection is a thorough visual inspection of the major systems of the home, such as Roof, Exterior, Electrical, Heating, Insulation, and Plumbing. A home inspection will not include evaluation of EMF Radiation, and you should call a specialist if you have any concerns about the property.
Have us perform your next Home Inspection! Call us today at 604 395-2795.
This New Westminster House Was Ready to Collapse | Featured Home Inspection
This week’s featured Home Inspection is a home in the Queensborough neighbourhood of New Westminster.
Age: Unknown
Stories: 2 (Plus finished attic)

A quick look at the front and one side of the home showed no real concern – a young (less than 5 years) roof and some newer windows.
Complete Foundation Failure
However, the south side of the home revealed a catastrophic foundation/wall framing problem. The wall was bowed considerably, and the poured concrete foundation was in pieces. The amount of lean on this wall is evident in the photo below:

What causes movement like this?
This part of New Westminster is situated on the Eastern tip of Lulu Island, which is also home to Richmond. The whole area is a flood plain, and the water table is extremely high. New Construction homes in this area are now built on pile foundations due to the poor soil conditions, however, due to the age of this home, it was a typical Slab on Grade foundation. Coupled with poor drainage and surface water management, and over time the home began to sink and lean.

Here we see one of the bathrooms, where the extent of the structure damage was visible. The bathtub was pulling away from the wall. There were also gaps where the wall was breaking away at the corners…

Because of the cracking…
…The tile shower enclosure was badly damaged – here’s a moisture meter reading showing complete water saturation behind the tiles.

Knob and Tube Wiring
Another problem with older homes is electrical wiring. In the basement and attic, old knob and tube wiring was present. Knob and tube wiring is an obsolete wiring material which is considered potentially dangerous, and needs to be evaluated by an electrician, particularly to keep the insurance company happy. (They are extremely careful about it)

A ceramic knob and the associated wiring is visible in the above photo. Coupled with the structural issues, this home requires some fairly major work. I recommended they contact a structural engineer, and an electrician to review the home. Safety is the top priority!
Call us today to inspect your home in New Westminster! – 604 395-2795
What’s Included in a Condo Inspection in BC?

Mark: Hi, it’s Mark Bossert from Top Local Lead Generation. We’re here talking about building inspection with David Fairbairn from Fairbairn Inspections in Vancouver. How’re you doing today David?
David: I’m doing great Mark, how’re you doing?
Mark: I’m good. As you can see I’ve got a little bit of sun this morning. I was doing some building inspection on my home, building repairs, I guess. So we’re talking about condo inspection today, so what’s the difference? What’s included in a condo inspection when you do it here in BC?
David: So what we do with our Condo Inspection is very similar to a Home Inspection, Mark. We’re obviously we’re going to concentrate on seeing things that are going to be important to the person moving into the property. So one of those, you know, you’re going to test all the components of the house just like you would, you know like your heating system, your plumbing system, your bathrooms, your kitchen. One of the things that we do a little bit differently that not all home inspection companies do is test appliances and that’s with all our home inspections; testing the stove, the garburator, dishwasher, can even do the microwave oven. So these are the kind of thing we are looking at especially in a condo and we’re going to inspect the areas that surround the unit like for instance if you have a balcony, if you’ve got a roof top deck, any of these limited common areas. I’ve actually run into a couple of condos where there’s an attic. You don’t see it a lot, there’s actually a couple in Burnaby and they actually have full attic space that you can open up the attic and it runs all the way down the length of the condo and of course that’s part of the inspection. So everything that we can get our hands on, the more we can learn about the condo the better for you.
Mark: So, do you like flush the toilet and run water into the tub and the sinks and those sorts of things?
David: Absolutely, we test what we call functional drainage and functional flow, especially when you’re on the thirty-second floor of a high-rise building. We want to make sure your water pressure and your hot water is going to be available so when you move in there that first shower, you’re not calling me, cursing my name, so this is the kind of stuff that we want to make sure, we’re in the business of surprise mitigation. We want to make sure there’s no surprises when you move in.
Mark: So, what about common areas like parking garages and outside drainage of the building, or the building envelope, those kinds of things, since we had all those leaky condos here in BC.
David: Exactly, and our Condo Inspection includes all the common areas, so that’s your roof, parkade, your boiler room, your electrical vaults, your elevator room. Myself, I’m a Commercial Certified Inspector so I do commercial buildings inspections as well, I know what I’m looking at with these large buildings and if we can get access to those areas from the strata and not always, you know, sometimes they’ll say well o.k., we can’t let you in there right now or we can’t get you on the roof due to liability reasons, that’s fine, but if we can get access that we also have a look at it. I also like to go to the storage areas and the parking stalls to make sure there’s no moisture problems down there because that the thing you may not find out about until you’ve moved in. So, if you’ve got a, you know, a huge oil in your parkade and the strata’s going to assign you or you know, there’s a leak above your car, you know, it’s the kind of stuff we want to find out ahead of time.
Mark: Yeah, so how about strata minutes and that sort of thing. Are you checking into those?
David: Yeah, it’s part of the Condo Inspection, yeah, a free strata minute review. It’s just a, if you have an engineering report or a, you know, a depreciation report or anything like that and you may read through it and may have, maybe there’s a red flag in there and you don’t know what it means, you know, I speak English and I speak Strata so I can translate it for you and go through and help you out with that. Obviously you know, time permitting, you know, the sooner you can send it the better. I always prefer if you can send it ahead of the inspection but, absolutely, that’s something I do on a regular basis.
Mark: So, I guess that’s where you might see things like depending on, like I mean there’s all sorts of, and types of strata like, we lived in a strata for a while where we had, they were like duplexes essentially and there were only twelve units or sixteen units in the complex but there was a budget and a time frame where we had to replace the roofs for all the sixteen units.
David: That’s a big job.
Mark: So that, but it’s in the strata minutes of well we’re in year ten and at year twenty we’re replacing all the roofs and here’s the budget number. So are you looking for those sorts of things as well as kind of ongoing maintenance or surprises?
David: Yeah, exactly, yeah, I think you pretty much hit it on the head, you know a roof assessment, you know, you pretty much assume that in every building’s life, every twenty to twenty-five years there going to put a new roof on, so we want to know how old the roof is and if you just have your strata minutes, you know, there might be just a mention in there of o.k., you know what, you know, we had a leaky roof and that might kick off a roof replacement that you didn’t know that so, you know, so if you can get your hands on a depreciation report like you’re saying where it’s actually broken down by year, o.k. you know what, in 2018 we actually going to put a new roof on; let’s start saving now. That’s usually a good sign actually, that shows that you’ve got a proactive strata. But, if you’ve got reactive strata they’re going to panic in 2018 and put out a huge levy on everybody as they weren’t prepared, right? So, that’s the kind of stuff we’re looking at and the strata minutes usually supports where that’s going to turn up, you know, so obviously we’re going to do our visual inspection, but you want to go behind the scenes and find out what the problems are.
Mark: So, what’s the best way to make sure I don’t buy a leaky condo?
David: There’s two ways to do that, you’re going to, you know with every, even just looking around at different condos you’re going to want to enlist a trained person who knows what to look for, that’s a home inspector, realtor who has experience with that, and you’re going to want to get your strata minutes, and your engineering reports. These are the kind of things that are going to help you determine if there’s a leaky condo problem. So, get it inspected every single time, get an inspector who’s familiar with commercial building construction and who’s familiar with leaky condo and envelope issues who can maybe point out a, you know there might be a problem here, why don’t you go look at your strata minutes and depreciation report and have a look at it and see if there’s any talk of maybe you know, redoing one of the elevations and you know that can be pretty expensive. So that probably the best ways to surround yourself with people who are familiar with that type of building and to read your minutes, read all your strata minutes, every single line, everything you can get, you know sometimes it’s every two years, get more if you can, look through everything, you never know what’s hiding in there and it’s going to be a huge financial difference for you, possibly, right.
Mark: So what would, like let’s talk about that. Maybe not everyone is familiar with the whole, cause it’s kind of died down a little bit, so what is, what’s the ramification if you buy a place that they suddenly they find that it’s leaky and what are we saying, what are we mean by leaky and then what are the ramifications, what could they be as big as, say, financially?
David: Yeah, good question. I should elaborate on the leaky condo crisis. There was a problem that lasted from about 1982 to 1998 in Vancouver where we built buildings that leaked and they had huge, huge moisture problems. You know, a lot of them were designed similar to the buildings they had in California where there was a lot of, you know you had a lot of, interfaces, usually like a California style stucco, low rise, four story building with a, you know, a flat roof kind of looks like a cube with a bunch of stucco on the outside of it. Kind of risky buildings that, they get really spectacular failure, you know, they leaked, we had mold, they had structural rot in a lot of these buildings and we were looking at multi-million dollar repairs and it’s been a problem, only recently sort of tapered off around 2000 and prior to that, if you’re looking at a condo let’s say you want to look at a condo that’s built in 94, you know, in the Fairview Slopes area, that was a bad area; you definitely want to get a depreciation report, find out if there’s a rain screen installed which is the solution for a leaky condo and also call around. Call a home inspector, have the place inspected, ask a realtor, you know, these are the kinds of things that . . . . .
Mark: Awesome, and in some cases this was, that could be, you know, you can throw numbers like millions but it could have, in some cases it was two, three, four hundred thousand dollars per unit to get repaired.
David: Yeah, I think the highest, the highest that I ever had direct experience with was a hundred and twenty thousand dollars per unit. In some cases in Port Moody there’s a building that they actually, the strata went bankrupt, they became insolvent and they actually, everybody just sort of left the building, they walked away from the mortgage. The bank bought it, did the work they needed to do and resold it, where they took it back. So, go to Google, we’ve got a great article on our blog, ‘How to Identify a Vancouver Leaky Condo’ and there’s a lot of good information if you go to Fairbairn Inspections.com. There’s a blog post on there that’s going to show you exactly, you know, what a rain screen looks like, why you need one and you know, if you educate yourself a little bit you’ll be able to walk down a street and actually go hey o.k. maybe that one’s got a rain screen and maybe that one still needs it and you know, if you can educate yourself on this issue, especially type condos in the Vancouver area in that time period, you know, you could dodge bullets, so . . . give me a call anytime. My number, I think I forgot to put that number but you can go to our website, email or phone number and give me a call. Happy to help you out.
Mark: So, we’ve been talking about condos and what’s included in a Condo Inspection in Vancouver, BC with David Fairbairn from Fairbairn Inspections.com. You can reach him at 604-395-2795. Next time he’ll turn his little ghost machine on so he has his number on there. Thanks a lot David.
David: Thanks Mark, talk to you later.
Mark: O.K., bye.
Inspecting a Mobile Home in Surrey | Featured Home Inspection
We inspected this Mobile Home in the Fleetwood Area of Surrey recently. Mobile/Manufactured Homes are interesting to inspect – the foundations, electrical and roofing systems are completely different than a site-built home.
The unit was a small single-wide, approximately 70 ft long and clad with a metal exterior, and a metal roof. The trailer featured some newer vinyl windows – a nice upgrade from the original aluminium windows.
There were a few concerns at the exterior, particularly this exposed corner that was allowing water to enter the wall cavity from above. Flashing should be added right away to prevent further deterioration.

A covered porch / workshop had been built off the side, which was starting to deteriorate and we deemed it unsafe until the rotten framing was replaced.

The porch felt spongy when stepped on – investigation below revealed several wood posts that were rotting and needed replacement. The porch was also poorly constructed, using 2×4″ wood joists which were bowing due to lack of support.

Manufactured Homes require specialized furnaces that are rated for manufactured buildings. This furnace featured a stamp authorizing it for use in this setting. The furnace was a 1983 Intertherm that was clean and operating well.

The electric hot water tank was located in the bedroom closet. At 13 years old (and starting to corrode), it had reached the end of its expected service life. These tanks typically last 8-12 years, and the GE-brand tanks tend to fail earlier due to their poor quality control. This will cost about $800 to replace.

Overall, the home was in fair condition, and the buyers negotiated to have the hot water tank replaced and the deck repair paid for- about $3000 in savings.
Call Today for your Mobile / Manufactured Home Inspection! – 604 395-2795
Water Leakage into Crawlspace of a Port Moody House – Featured Home Inspection
We inspected this home in Port Moody, BC recently. It was a 30 year-old home with a split crawlspace / basement configuration. The lot was sloped considerably, and a prior rain (the day before) provided ideal conditions for a Home Inspection.

Entering the crawlspace, there was considerable water damage and rot to the floor structure, below the base of the chimney.

Several joists were deteriorated, and heavy mold growth was found in the area. Here we can see the moisture levels showing complete saturation:

Everyone (including some contractors) initially suspected poor lot grading to be the cause, however, a close look at the area (and water testing) showed no water pooling issues in the area.

Water testing of the chimney finally revealed the culprit – a failed chimney flashing that was allowing water to enter behind the vinyl siding and ultimately winding up in the crawlspace. The water traveled two stories down, and pooled at the base. It can be seen at the top right of the below photo:

Final Cost: $2500 + Tax
The repairs were completed by Ken Hunter from HunterStruct, an experienced general contractor who specializes in structural repairs.
The buyers were thrilled to have the work completed prior to their possession date, and recently moved in.
Want the job done right? Call us for your next Port Moody Home Inspection – (604) 395-2795
Perimeter Drain Blockage in Vancouver | Featured Home Inspection
We inspected this property in Vancouver, which was built in 1943. Most of the home was in “original” condition, and many of the components (wiring, insulation, plumbing) were original and in need of a lot of work.

In the basement, we can see an interior sump, which were popular until about the early 70’s. The sump pit is a receptacle for rain and surface “storm” water, and is designed to overflow into the city storm drain. However, the problem with interior sumps is obvious – directing water into the basement puts the home at risk for flooding. Right away we can see that there is a moisture problem in this area, as the owner has placed a dessicant container next to it.

This downspout tied into the perimeter drains. Homes built after 1986 in the lower mainland typically use a 2-pipe system, however this was a single-pipe system.
Inspecting the exterior, the original terra cotta perimeter drains were noted, and I recommended having a drain line scan performed. A plumber can insert a camera through the lines and determine if there are any blockages or breakage. Old terra cotta lines, while resistant to root damage, can crack or crumble below grade.

The plumbers scanned from three locations, including the drain at the bottom of this stairwell. Flooding of the stairwell was evident (not in the photo) due to a large amount of wood rot at the base of the door.

Here’s a photo from the drain camera – we can see some debris but the line is mostly clear. However, there were some issues.
1. The interior sump piping entry points were extremely high (only 4″ below top of pit), so there was almost no “buffer” should the lateral back up.
2. There was a large obstruction near the sump (photo below):

The drain in this area (below the deck) was completely blocked off – whether this was intentional or a result of construction work was unclear. In any case, it will not function and required expensive excavation and drainage work.
The plumber quoted from $10,000 – 18,000 to repair the issue, and the buyer saved a significant amount of money off the purchase price of the home.
If you’re buying an older property, I recommend having the drains scanned. And, of course, getting a high-quality Home Inspection performed by us. It pays!
Give us a call today! – 604 395-2795
Port Coquitlam Wiring Disaster | Featured Home Inspection
We inspected this property in Port Coquitlam, BC recently. It had an illegal suite, and we found a number of dangerous electrical problems from the home owner’s “DIY” project…
The sub-panel was badly corroded and had no identifying stickers or information. We can see (photo below) that it was probably salvaged from another building where is was exposed to water. Corroded or water-damaged panels are always a safety hazard, as rusted metal can overhead or arc, causing a fire.

Next, we see a corroded lug. A quick surface temperature measurement showed it was overheating.

A double tap is an illegal repair whereupon two conductors (wires) share the same breaker. It’s usually done when there are no spare locations to add another breaker. The problem? The breaker is only designed to carry one wire. If you add a second wire the connection becomes loose and the wires make poor contact. The result is overheating, and the breaker may also not perform properly. (Tripping early or late).

Below we see the real double-tap at the red arrow. Fixing a double-tap is easy – but in this case replacing the sub panel with a larger one was the best option.

The buyers purchased the property and the electrical safety upgrades are currently under way.